Time-lapse is one of the most popular features of MIOPS SMART, MIOPS MOBILE REMOTE, and MIOPS MOBILE DONGLE. You can adjust the time interval and the number of the photos to be taken either using the smartphone app or the time lapse menu of the device if you are using MIOPS SMART. The rest is just waiting for your camera to complete the job as directed by MIOPS SMART camera trigger or MIOPS MOBILE camera remote. This is only the first half of the story. The second half is processing these photos to create a time-lapse video.
In this tutorial, we will show you how to create a time lapse video using your photos and free software. You don’t need to buy additional software to create such a video. VirtualDub is a free video processing software. It enables you to create time-lapse videos with a just a few clicks. You can download VirtualDub form www.virtualdub.org. It is delivered with GPL (GNU General Public License).
The first thing you need to do is renaming the photo files sequentially. In most cases, your files will be named sequentially anyway (picture_0017.jpg, picture_0018.jpg, etc.), but if this is not the case you can do this very quickly. First, create a dedicated folder to store your photos and copy all of the files to that folder. Then select the files with Ctrl+A and select “Rename” from the right-click menu. Give a name and all of the files will be renamed sequentially as photo 1.jpg, photo 1 (2) jpg, photo 1 (3).jpg etc. In order to be able to use all of them in the same video, the photos must of the same dimension. If this is not the case you have to drop the file that is of the different size. This will not be the case if you haven’t changed your camera settings during your time-lapse shooting.

Figure 1: All photos added to the timeline
After you have all of the files ready in the folder, just go to VirtualDub and open the first photo using the “File -> Open Video File” command. All of the files will be just added to the timeframe. You are almost ready to create the time lapse video, but you just need to do some more settings. It is math time. Yes, I said math.

MIOPS SMART+
Take impossible photos by turning your camera into a high-speed capture device!
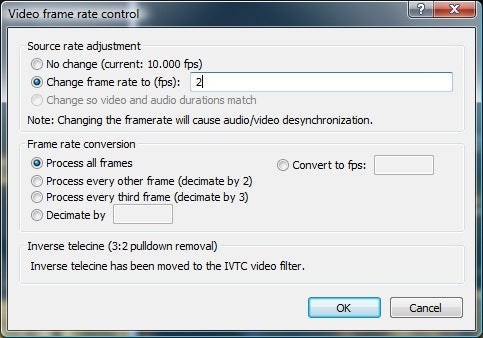
Time-lapse video requires a little bit of calculation to decide what your FPS(frame per second) setting should be. It is actually a very simple calculation. The FPS number equals the total number of the pictures divided by the length of the video you want to compile. Let’s say you have 100 pictures and you want the video to be 2 seconds long. Your fps setting should be 100/50 = 25 FPS. You can set the FPS of the video from the VirtualDub Video->Frame Rate settings. The shortcut for this is Ctrl+R.

Figure 2: Frame Rate Settings
After this, you just need to save the compilation as an AVI file. You can do this by selecting File -> Save As Avi, or with the shortcut F7. You can play the timelapse with any video player software as it will be saved in AVI format.
Related Article: How to Shoot the Perfect Long Exposure Time Lapse
Related Article: Time Lapse Explore Site


