


Capturing the raw power of a storm and the brilliance of lightning strikes requires skill, patience, and the right equipment. Whether you're an amateur or a seasoned photographer, this guide will help you master storm and lightning photography with both DSLR cameras and iPhones.
1. Safety First
Before venturing out to capture storms and lightning, your safety should be the top priority. Here are essential precautions:
-
Find a safe location: Avoid open fields, high places, and tall trees.
-
Stay inside a vehicle or a shelter: A car with closed windows can provide protection.
-
Monitor weather forecasts: Use an app like Photo Expert.
-
Have an exit strategy: Be prepared to move if conditions worsen.

2. Essential Gear for Lightning Photography
For DSLR and Mirrorless Cameras:
-
Camera: A DSLR or mirrorless camera with manual settings.
-
Tripod: Essential for long exposures and stability.
-
Remote Shutter Release: Prevents camera shake.
-
Wide-Angle Lens: Captures more of the sky.
-
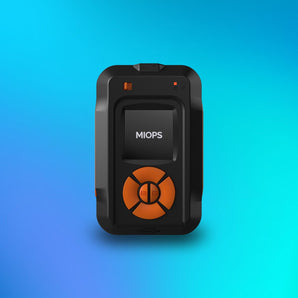
Lightning Trigger: MIOPS Smart+– A professional lightning trigger that detects lightning and triggers your camera for precise captures.
For iPhone Users:
-
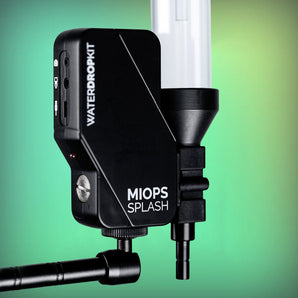
MIOPS Spark – A lightning trigger with an internal sensor that detects lightning and triggers your iPhone to take a lightning photo.
-
Tripod: Stability is crucial for long exposures.
-
Clip-on Lens: Enhances field of view for iPhone users.

3. Choosing the Right Location
Select a spot that gives you a wide, unobstructed view of the sky. Some of the best locations include:
-
Open fields or plains
-
Coastal areas
-
Hilltops (but not too exposed to lightning)
-
Cityscapes for dramatic urban storm shots
4. Camera Settings for Lightning Photography
For DSLR and Mirrorless Cameras:
-
Mode: Manual (M)
-
Aperture: f/8 – f/16 for sharpness
-
ISO: 100 – 400 to minimize noise
-
Shutter Speed: 5-30 seconds (depending on storm activity)
-
Focus: Manual, set to infinity
-
White Balance: 4000K-5000K for a natural look
Use MIOPS Smart+ to automate capture when lightning strikes.
For iPhone Users (Using MIOPS Spark and Snap Pro Camera App):
-
Use MIOPS Spark to Automatically Capture Lightning
-
Use Long Exposure Mode
-
ISO 100-400 to reduce noise
-
Shutter Speed: Adjust manually to 3-10 seconds
-
Lock Focus to Infinity
-
Shoot in RAW for better editing flexibility
5. Post-Processing Tips
Editing can enhance lightning shots by improving contrast, sharpness, and color. Use:
For DSLR Users:
-
Adobe Lightroom: Adjust contrast and highlights.
-
Adobe Photoshop: Stack multiple lightning images for a dramatic effect.
-
Nik Collection: Enhance details and remove noise.
For iPhone Users:
-
Snapseed: Adjust highlights and shadows.
-
Lightroom Mobile: Fine-tune exposure and clarity.
-
Darkroom: Improve color balance.
6. Additional Tips for Stunning Lightning Shots
-
Use the Rule of Thirds: Compose with an interesting foreground element.
-
Shoot Multiple Frames: Increase the chances of capturing lightning.
-
Try Different Angles: Experiment with reflections and silhouettes.
-
Combine Multiple Shots: Layering images in post-processing can create more dramatic compositions.

Conclusion
Storm and lightning photography is both thrilling and challenging. By using the right settings, safety precautions, and tools like MIOPS Smart+ for DSLR and MIOPS Spark for iPhone (which works with Snap Pro Camera App), you can capture breathtaking images of nature’s raw energy.
Now, grab your camera, check the forecast, and head out safely to capture the storm! ⛈️📸